What was once a thriving poultry operation now sits abandoned and filled with a 30-year accumulation of cast off tires, fuel tanks, lumber, roofing steel, chimney pipe, left-over insulation, a variety of ladders, cast off windows, doors, screens, old bicycles and various trash. And should we mention the ton or so of old straw, dirt and manure that accumulated over many years on the floor? This photo was taken in August, 2012 as rehabilitation was about to begin. Relatively new roofing steel from a house recently demolished is piled on the ground and will be recycled in Phase I, after major branches are cut away from the elm tree rising above.
Constructed in the early 1920’s, the chicken house was built to be efficient and to endure. It is large by most chicken house standards, at 40′ x 16′. Nesting boxes, feeding troughs, a grain storage bin, roosts that could be lifted for cleaning, windows for light, fresh air silos for ventilation, and insulation with a mixture of straw and coal slack are just a few of the “modern” innovations the designer/builder thought of. The chicken house held upward of 200 laying hens in the glory days, and the “egg money” often paid the bill at the local general store where food and other staples were purchased.
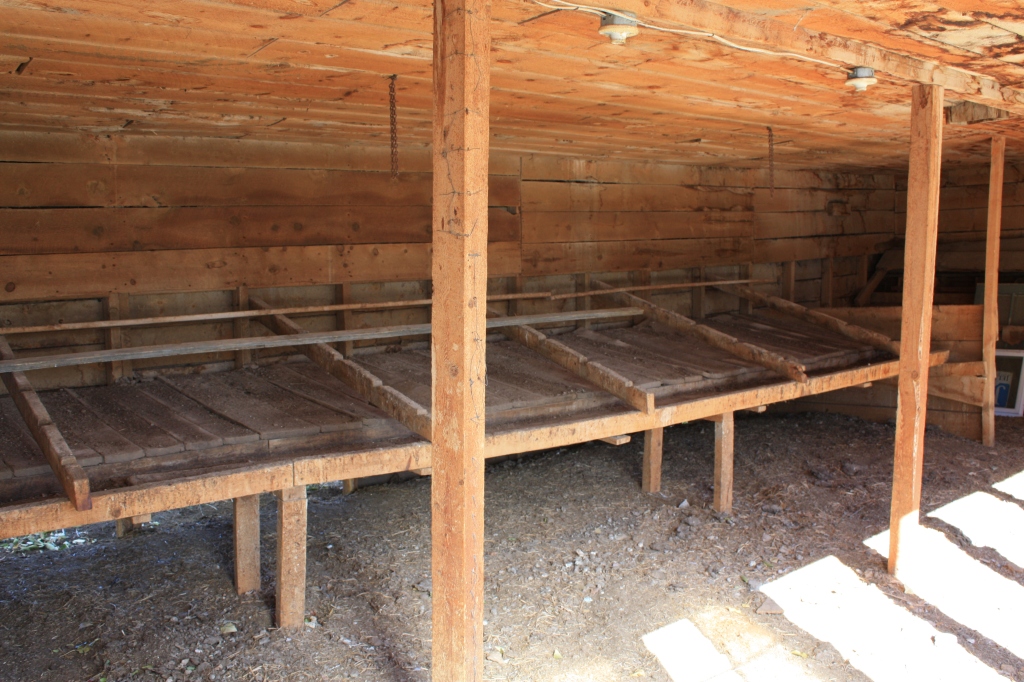
Roosts are currently being removed for cleaning and some replacement. The notched 2×4’s lift up and are anchored by the chains hanging from the ceiling. Manure was raked down into the “poop chute” and shoveled out into a cart to be recycled on the flower and vegetable gardens.
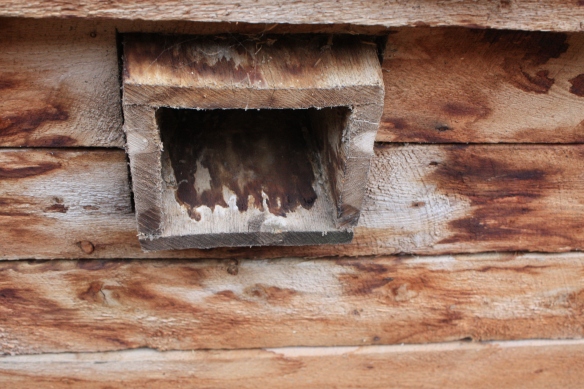
A lot of grain was shoveled into barrels inside through this little chute. Made for an efficient way to replenish the chicken feed.
Two 50-gallon barrels held chicken feed inside this bin, which has an outside opening which made re-filling easy.
Note the insulation in the cracks behind the rough lumber interior walls. It is comprised of chopped straw and fine coal slack, which is a curious mixture indeed! While trying to nail down a loose base board, I scooped out some of the insulation so the board would nail back to its original position, and the stuff just kept coming. I emptied most of a small section of wall before I could stop the flow of straw and coal slack cascading down through the opening behind the loose board.
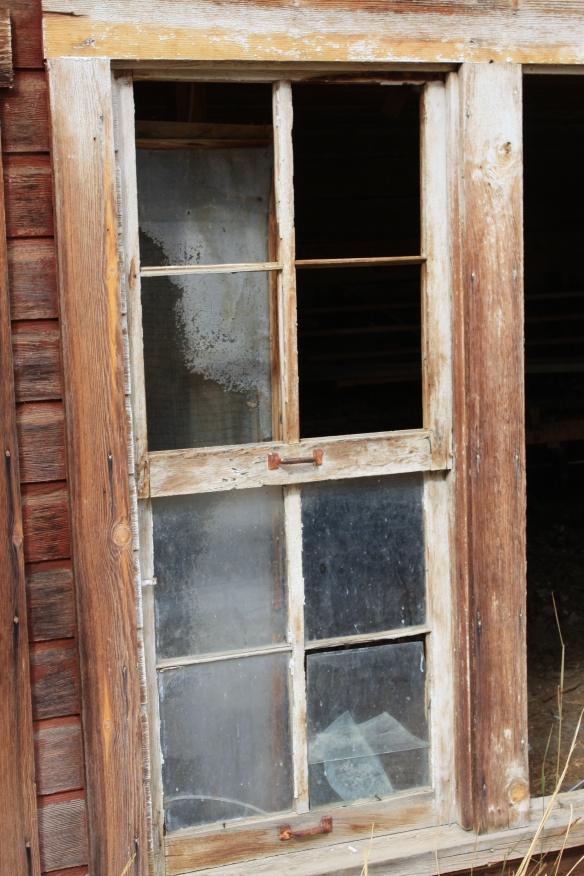
Determined to save and refurbish the old windows, I began by removing all of them (20 individual windows, 80 panes of glass, need I say more?) I went to the Internet for the best technical advice and realized I didn’t have much of the available technology (a heating tool to soften old window glazing, a gun to install glazing points, skill saw to create new muntins). What the heck, this job was going to get done with grit, elbow grease and sweat equity. 1. Remove old glass; 2. remove old glazing; 3. remove old glazing points; 4. scrape and brush old paint, dust, dirt and grime; 5. replace broken muntins (this required the help of my carpenter/contractor); 6. paint all surfaces with linseed oil; 7. install new heavy duty glass panes with new points; 8. glaze all 80 panes with oil-based putty; 9. wash residue from glass; 10. trim off excess putty; 11. paint exterior of window frames and glazing with oil-based primer; 12. remove excess paint from panes; 13. prep window openings with linseed oil and primer; 14. install windows. No hill for a climber.
Early-day construction began with a foundation of flat stones picked up from the mountains and hills nearby. I was relieved, after digging about a foot of soil away from the baseboards, when the shovel struck these stones. It was a comfort to know the old chicken house actually sat on a solid foundation.
The north wall of the chicken house did not have the Dutch cove fir siding the rest of the building was finished with. Instead, bales of straw were stacked to the roof, held in place with poles and sheets of tin. That insulation kept the north wind and bitter Wyoming winters at bay and worked for well over 30 years. Sometime in the 1950’s the straw wall had deteriorated to the point it had to be replaced with asbestos siding, which today is badly in need of replacement as well. Back to the Internet to locate Dutch cove fir siding. Eeeek! They don’t give the stuff away and we will need 500 square feet. Haven’t found any local suppliers, so will have to pay shipping costs as well. And, I need some extra for the old homestead cottage which has the same siding and could use a little sprucing up. But that’s another project!
The old steel roof has a beautiful rust-colored patina but has been trying to blow off for years. The 1″ x 6″ cross beams had rotted due to moisture and age and all had to be ripped off. Fortunately, we had cleaned and saved a pile of 1″ x 6″ lumber that was used to frame the foundation for an addition to our house. We only had to purchase a few more to completely replace the cross members and then screw down the new (recycled) steel roof. We also had quite a few rolls of left-over insulation that we laid down over the foot of old straw, which was in remarkably good condition. And we got to wear our new knee pads for the occasion – I thought I would never need them!
The east end contains 16 feet of nesting boxes with rails for chicken access. As a child one of my chores was to gather eggs, and often the hens would still be sitting on their bounty, which was warm amid all the soft feathers. The hens would squawk in protest, leap to the floor and tear off in clucking indignation at the injustice of surrendering their eggs to the basket.
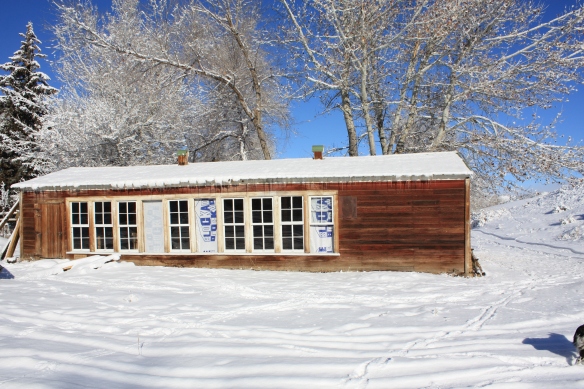
We were fortunate to obtain this recycled tin in the same color as the roof on a new pole barn we built to house our cars. In the spring a coat of paint will have the old girl looking like new! The old red and white has lasted 50-odd years but is looking pretty tired.
We installed most of the windows before a winter storm arrived on Thanksgiving weekend. Awaiting two frames that needed new muntins and stiles, which is giving our carpenter fits. Also have one window waiting for primer, then we can finish installing all the windows. The guinea fowl won’t wait, however, as winter has arrived and the geese need to move into the former guinea quarters. Such is life with too many critters!
Twenty guinea fowl in a chicken house built for 200! They seemed a little lost at first and have to keep warm with a heat lamp hung over the roost at night. We are hoping they will be comfortable, and pleased that we have been able to bring a marvelous old chicken house back to life. In the spring, we will install the fir siding on the north wall and east end, repair some of the trim and put a new coat of paint on everything. We will also restore electricity to the building by laying it underground. We currently are running an extension cord for the heat lamp and heated water bowl. That will be Phase II and when completed, we will have the satisfaction of knowing we restored an historic structure that should last well into the future. And it will look great to boot! My granny would be proud.
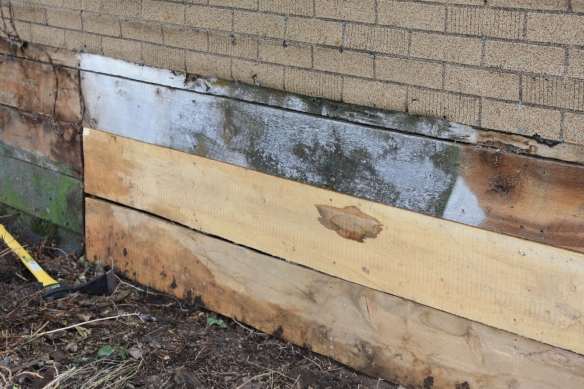
Segue to September, 2013 and Phase II is underway. Scraping the old siding was a tough job and required a mask to prevent lead based paint chips from being ingested. The old siding, nearing 100 years old, is still sound in most places. A few of the bottom two boards had to be replaced and that was another miserable job trying to get the grooves to fit and the straw and coal insulation from rushing out from between the walls.
Trying to get a coat of primer on before cold weather hits. Oil-based primer, with an addition of linseed oil worked very well. The deep grooves of the weathered wood sucked up paint and the local Sherwin Williams was so happy to see me coming.
The old rolled siding, installed during the 1950’s, has begun to deteriorate. It served its purpose, as the original builder did not put cedar siding on the north wall or the east end.
New boards replace the old, rotted ones.
My toughest critics, the guineas aren’t sure they like the paint job.
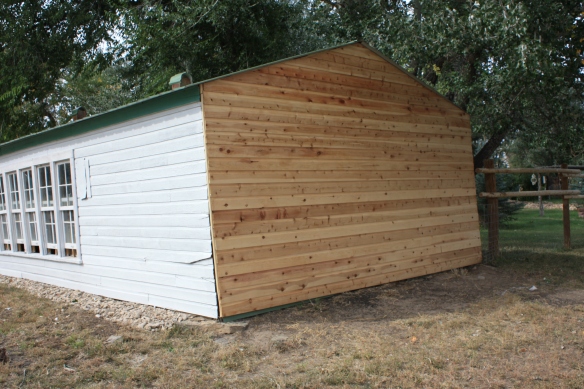
Western red cedar siding, 518 sq. ft., for the north wall and east end. This was our major purchase for the chicken house restoration and was an education in itself. I learned about “reveals” and “rabbets” and was able to duplicate the original siding with this Dutch Lap pattern. The lumber company provided a 20-page installation manual that we found most helpful. The first step was to prime the lumber on all surfaces, front and back, with a sealer. I used a roller and draped the boards over saw horses. I re-stacked them with enough air space to allow the sealer to dry. This was the most tedious task of all.
With the help of our contractor/neighbor Tom, we installed #15 tar paper over the rough lumber of the north wall. Then we applied 1×4 firring strips to nail the siding to. This step was necessary due to the uneven surface of the old lumber.
The siding went on beautifully, and made me wish I didn’t have to paint it. We laid gravel along the sides to prevent dirt and mud splash back on the walls and protect the paint.
By the time I finished priming, then painting this 40-foot north wall, I was sick of it. And we still have to install, and paint the trim along the top of the wall. Trying to balance a paint bucket, brush, rag etc. and keep from sliding off the roof as I primed the fresh-air stacks was a challenge as well. We secured an old wooden ladder for me to cling to as a scaffold of sorts, and it worked. I remember hammering nails in the old tin on this roof with no fear. The new roof is a lot more slippery and I am a lot older!
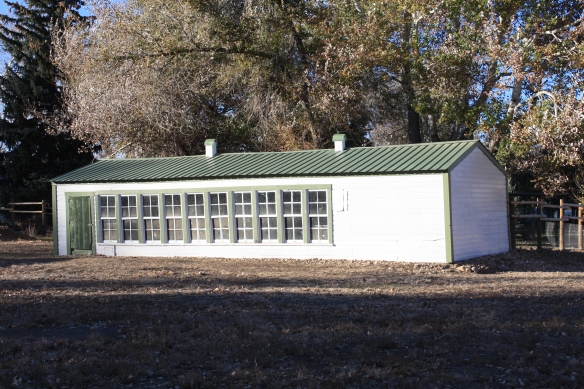
This old structure has a new lease on life and should last another 100 years, barring some calamity. Our investment of $3,800 fine-tuned an historic building that still had lots of useful life and structural integrity.
The plan is to move our little flock of 12 chickens into their rightful home. The guineas will move into another shed and we don’t know how they are going to feel about that. We still have to clean the windows and put fresh straw in the nesting boxes. Now it’s on to the next restoration project!











As shucks, I was looking forward to helping! Guess I’ll just have to eat buns and sip sugared tea near the fire my next visit . . .
LikeLike
Reblogged this on Wild Wyoming Woman.
LikeLike
Pingback: Chicken House Restoration For The Birds! | Wild Wyoming Woman